Purpletree Software LLP is a software development company primarily involved in developing software for enabling eCommerce merchants.
We are an approved startup under "Startup India" program from Government of India.
In Magento 2 Multivendor, How to calculate and manage commission on excel? Which formulae should I apply? How can I view the commission received by the admin or seller? Really difficult to track for e-commerce businesses and finding the best solution for it, is important. Calculating the commission of each product sell and maintaining its record is one of the hectic and tedious activities that every online business has to do.
The commission is a payment that can be made to an employee for his service or to a seller based on the terms and conditions of buying something through the seller. There are various kinds of commission models used in businesses, and they've seen both online and in physical storefronts.
Let’s have a quick look at the Magento multivendor extension offered by Purpletree Softwares for the commission calculation module, which helps to set, view and calculate the commission in a simple and reliable way.
After a successful installation of the Magento multi-vendor marketplace extension, we need to configure by logging-in via the admin panel to calculate and receive the commission.
Enter the commission for admin of seller products for the category of products to be sold. By default value is set to 10.
Seller Commission
In this seller page, we can view the commission receivable by admin for each completed order for this particular Seller.
How can an Admin view commissions
Through the admin panel, admin can view commissions of all the orders of sellers.
Add/Set Commission
This can be done by admin only who can assign the category of commission applicable to the products in a category.
Add commission percent for each product sold by a seller.
Expand the tree and click the radio buttons to select the category.
Save commission.
Edit Commission
If the commission is to be edited, just click the plus sign of the tree and check the selected categories.
How and at when Commission would be calculated
The commission can be calculated after the completion of the order. The admin will get the commission automatically after the completion of the invoice and shipment of any order. There are three criteria for the calculation of the commission.
Commission based on category basis: Here the commission is based on all the products of a category.
Commission based on seller: Here the commission is based on the number of products sold by a seller.
Commission on a global basis: This is applicable to all products mentioned on the website.
The commission is checked first on a category basis, then on a seller basis and then on a global. It means that the commission on the category basis is checked first but if that product is available in more than one category, the maximum value of the commission is selected. If the category commission is not properly defined, then the commission is paid according to the seller commission. If that too is not defined, then a global basis commission is considered.
The commission list will be updated only after the completion of an order.
Registration of a seller
If anybody wants to become a seller, then he has to create a customer id and then he has to select a checkbox to become a seller. After that, the person has to enter a URL for his store. Then the user has to click Create the Account. An Ajax call will check the uniqueness of the URL and then the account will be created.
Two-factor authentication extension provides the functionally to authenticate the customer in a store. Opencart two-factor authentication app is very useful in many ways as if the information of users that admin has is appropriate admin can easily contact the user very easily through the mail and contact number. In that, we have provided the choice where the admin wants to show the popup.
There is a new update in the 2-factor authentication extension is that admin can create the default template of the message that is sent to mail and contact number to verify them.
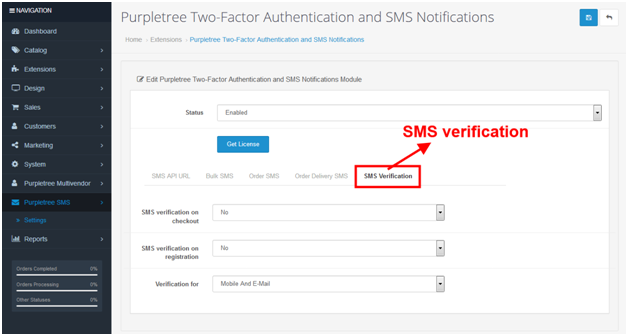
· In the first step to create the SMS template for OTP verification message go to > Admin > Purpletree SMS > Settings > SMS Verification tab.
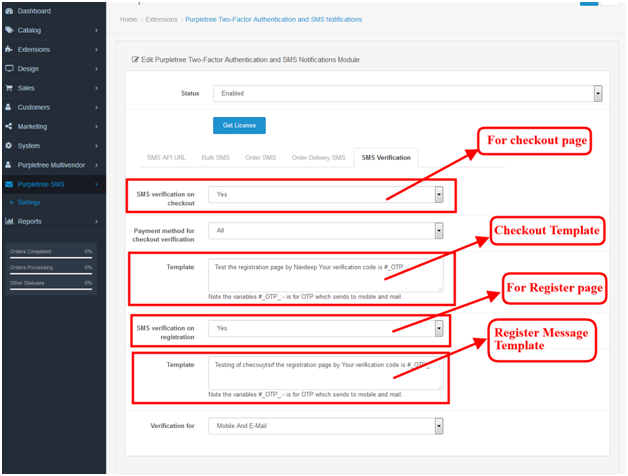
· In the second step you need to choose the page on which do you wants to show the verification popup (In which user have to enter the OTP which comes on email or mobile). There are two pages that are checkout and register page so, select the page from the dropdown on which do you want to show the popup.
· In the above screenshot as you can see the checkout template and register page template admin can define any template separately for both checkout and register page.
· There is a question arise how _OTP_ variable need use. Leave the _OTP_ variable constant where you wants to show the OTP number for example:
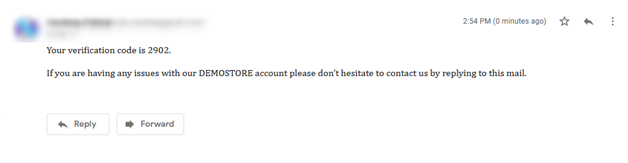
A sample template I have created-
“Your verification code is _OTP_.
If you are having any issues with our DEMO STORE accounts please don’t hesitate to contact us by replying to this mail.”
Opencart Blog Pro extension provides Blog functionality to your Opencart store like Category functionality to create blog base of the blog category, comment management functionality to manage customer comment on blog and SEO URL functionality to fast search by customer. Opencart Blog Pro extension provides the Popular posts module and Latest posts module for show blogs. Tag management is a good functionality of this extension. Opencart Blog Pro extension also called Opencart blog module, Opencart blog extension, Opencart blog, and Opencart blog plugging.
How Admin can add blog Post
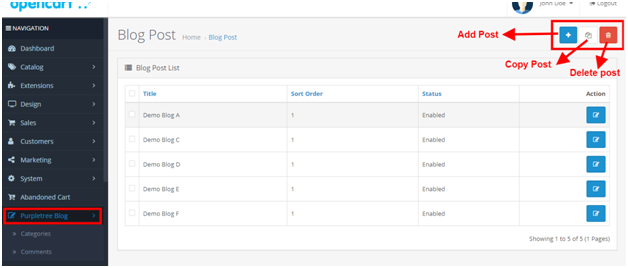
First of all successfully installed Opencart Blog Pro extension. If you want to create a blog based on category, then go to the Purpletree B log menu and click on it, after that select category and click to add category button, to add blog category. For add blog post go to Purpletree Blog menu and select posts and click on it, after that, you will reach on the blog post list page. Here you can add a new post, delete a post, edit post and copy post for creating a duplicate post.
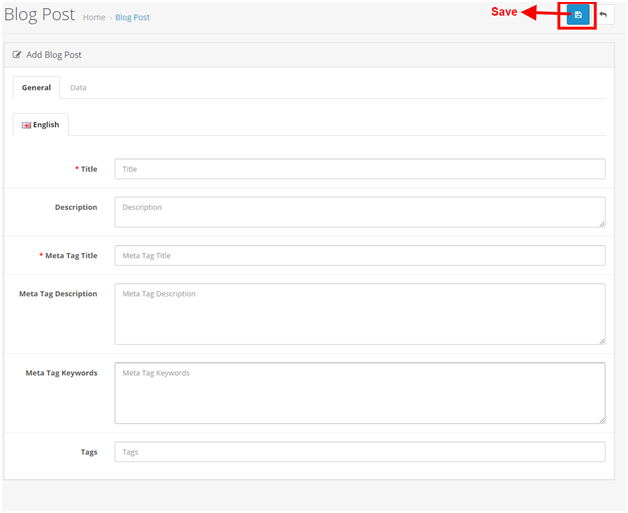
For create, new post click adds button and you will reach Add post page. Here fill all information related to blogging posts such as Title, Description, Meta Tag Title, Meta Tag Description, Meta Tag Keywords, Tags in General Tab and Categories, SEO URL, Stores, Image, Status, Author and Sort Order. Fill all information and click on the Save button.
In this form, some field is required then and click on the Save button. For edit, any blog post selects post in the post list and click on the edit button. Change information and click on the Save button.
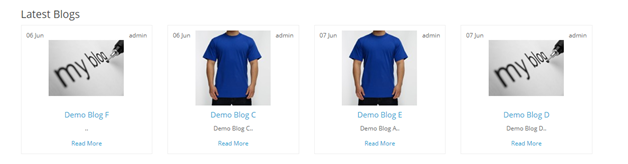
For show blogs post, seller blog modules base of the user guide .after that your created Blog post-show on your selected layout page.
You can get FreeTechnical Support: 6 Months with buying Opencart Blog Pro extension.
PurpleTree has released its new and upgraded version of Magento 2 Multivendor into the market, and now the users are confused about whether to shift to Magento 2 or stay with Magento. Almost 9% of the E-commerce sites across the world are running on Magento. After Adobe acquired Magento, it is evident that there will be a lot of changes in the E-commerce ecosystem. Magento can now use Adobe design tools and other cloud technologies with ease.
Magento 2 has a lot of new features when compared to Magento 1, and this has put people in a lot of confusion. So, now let us see whether Magento 2 Migration is worth the hassle or not.
What is Magento 2?
Before understanding Magento 2, it is essential to know its significance. Magento 2 is an upgraded version of the E-commerce platform, and 1 in 4 businesses across the world is using this solution. Most of the users have accepted this updated version with open arms, and people are in love with its revamped look.
Magento has Three Separate Sources
Magento 2 Open source:
If you are running a small business or want to set up a small online store, then this open-source version will be perfect for you.
Magento 2 Enterprise Edition:
This is the premium version that is perfect for both medium and large-sized businesses. This version will have some of the best features that will aid your business a lot. Extensive management and marketing tools will provide some great features.
Enterprise Cloud Edition:
This is the pricey version, and it removes the need for self-hosting. This SaaS service is dependable.
The price is the main deciding factor here, and almost all the businesses prefer the open-source version of Magento 2. Only 9% of the users are using the Enterprise edition. Whereas, the people using the Enterprise cloud edition is even lesser. If you are planning to avail Magento 2 migration service, you must pick the right version that suits your requirements first.
Introduction of Magento 2 in the Market
The selling point at the time of the Magento 1 launch was its flexibility. The design of Magento 1 was so flexible that users could customize it and understand it according to their requirements. But as the developers started focusing more on the flexibility, they missed one of the significant factors which involve the user interface. The user interface was changed, and it has become hard for users to understand how it was working.
Magento 1 did not have all the features that users were anticipating. The rival E-Commerce platforms had so many features like responsiveness for various devices, optimization for search engines, etc. Moreover, the users have also complained that the page loading time was deficient.
These are the reasons why the company launched newer and updated version Magento 2. This version has all the features that were missing in Magento 1. It is a completely revamped version of Magento 1.
Improved Performance
When compared to Magento 1, Magento 2 is faster. It has proven that the websites on Magento 2 are 20% faster than on Magento 1. The site speed is one of the critical factors in optimization. This speed has also resulted in better sales too. There is both an increase in ranking and sales of sites because of the improved performance from Magento 2. You can get the best Magento 2 migration plan and shift to a faster and better website quickly.
Streamlined Checkout Process
For any E-Commerce site, Check out is the central aspect. Magento 1 was offering a 6 step check out process whereas the Magento 2 provides a simple two-step check out process. It makes the shopping process a lot easier for customers, and this indeed is a great way to impress your customers.
Simple Interface
There is no rule that every E-commerce store admin should have technical knowledge. The Magento 1 admin interface was so clumsy that it is harder for a non-technical person to understand it. But the situation is changed for Magento 2. This admin interface is pretty simple, and the clean interface will help in finding the tools quickly. Adding products to the list is also pretty more comfortable when compared to the earlier version. There is so many Magento Development Company in India, and it is easy for you to get a Magento 2 Migration solution quickly.
Key Takeaways
These are some of the benefits of Magento 2. You can hire Magento 2 developers and avail custom Magento development solutions which will bring a lot of changes for your E-commerce site.
No matter what is your industry or business domain, Purpletree Magento Development can help you in driving your E-commerce business. With a certified and professional development team, we are committed to offering the most reliable and precise services based on your needs.
Purpletree Magento 2 Mobile application is easy to use mobile app developed by Purpletree developers. It can easily setup for any store in Magento. After purchasing the Magento mobile app, just open a ticket with our helpdesk and send us some details of your store, we will setup and create a mobile app for you instantly, which will be ready to publish app on App store on Google.
The Magento Mobile app which we create is a Hybrid app, and is completely white label app means only client Brand, Logo, and Name, There will nothing related to Purpletree on a Real app, We already have demo app on Google app store, you can check the demo app, for the same.
The app data comes from Existing Magento website only and the Homepage content of the App can is setup in such a way that admin can change some of the content in real-time, which means no need to create a new app each time you want to change some content on the homepage.
Let’s start from the top, App Logo is not dynamic, means it must be setup on App Compilation, if you want to change the app logo, then we need to recompile app with updated Logo, so make sure to give the Official logo in the first place, then comes the left Menus and Categories, Menu Items are within app only and changes if customer logged in or Logged out of their account, But Categories and subcategories are totally dynamic and comes from Magento only. The Categories which are set to be Include in Menu are shown in the Left Menu, IF you want to change it, then just change the Categories from the admin panel, and it will automatically change on the app.
Then Comes the Top Slider, It is also dynamic and admin can change or remove the slider anytime from Configuration. Go to Admin > Mobileapp > Mobileapp > Configuration.
From there Select Show Slider to YES, If it is set to Yes, then all the enabledSlide Images which are added on Admin > Mobileapp > Mobileapp > Slides will be visible in Slider and admin has full control over it.
Then Comes the Top Categories which comes after Slider, Admin has to choose from Top Categories (Below Slider) to choose which categories to be visible with Image and Category Name. The Category Image which comes at this place is Custom Image for mobile app added in each category by admin.
Further, we go admin can choose from Banners for a predefined location, Just Select Banner in place of Banner 1, Banner 2, and Banner 3.
Admin can also choose if they want to Show Featured Products block and BestSeller Products Block on the homepage of the mobile app. Location of all the blocks is predefined in-app, admin just has to choose Yes or No, from the dropdown for their choice, and all the above settings can be changed in real-time, anytime by admin and changes will reflect immediately on Mobile app.
Then Comes the Top Slider, It is also dynamic and admin can change or remove the slider anytime from Configuration. Go to Admin > Mobileapp > Mobileapp > Configuration.
From there Select Show Slider to YES, If it is set to Yes, then all the enabledSlide Images which are added on Admin > Mobileapp > Mobileapp > Slides will be visible in Slider and admin has full control over it.
Then Comes the Top Categories which comes after Slider, Admin has to choose from Top Categories (Below Slider) to choose which categories to be visible with Image and Category Name. The Category Image which comes at this place is Custom Image for mobile app added in each category by admin.
Further, we go admin can choose from Banners for a predefined location, Just Select Banner in place of Banner 1, Banner 2, and Banner 3.
Admin can also choose if they want to Show Featured Products block and Bestseller Products Block on the homepage of the mobile app. Location of all the blocks is predefined in-app, admin just has to choose Yes or No, from the dropdown for their choice, and all the above settings can be changed in real-time, anytime by admin and changes will reflect immediately on Mobile app.
Amazing is a responsive Opencart Marketplace theme for version 3.x. It can be used to create a web store or marketplace with a design similar to the Amazon website. This theme works easily with the Multi-Vendor Marketplace extension for Opencart. That makes it easy to launch your own marketplace quickly and easily. You need not worry about your website working on different devices. This theme is 100% responsive for all devices and layouts. Mega Menu enhances the visual appeal of the website and makes it easy for visitors to locate products.
This module comes FREE with our theme. Use the power of Social Media and allow logins from Facebook, Twitter and Google Plus from your opencart marketplace store, using Purpletree Social Media Login extension. You get added capability of sending SMS on order confirmation and on other events, using our SMS extension for opencart, given FREE with this theme. Now catch those elusive customers, with this powerful Opencart Abandoned Carts extension, included FREE with this theme. The system can send automated emails to customers who have items in their carts. Banner Manager Module included with this theme. With the banner manager module, manage homepage banners in a dynamic manner. Popular Categories module also included with this theme. To highlight the most important categories from your store, use this module. Here one can set the popular categories so users can easily locate their products.
How to set Mega Menu
First of all, install an Amazing theme as for user guide. Go to extensions>extensions>select theme> edit default store theme. Change theme directory default to amazing and click on save button.
After that you again go to extensions > extensions > select module > install Purpletree theme setting.
Thereafter click on the edit button. You will reach an amazing theme setting page. Here you can select menu type like Standard menu or Megamenu menu and set Megamenu image Dimension. You can also set Header text for Megamenu. After that, you can click on the Save button.
After set Megamenu, Home page main menu look like this
More details of Amazing Responsive Opencart 3 Theme can be found here.
The Opencart survey extension enables you to setup survey questions for visitors to your store. There are many criteria for the selection of the survey audience. You can take the survey audience vote in the form of the option. You can see the survey result in a form of survey chart and survey report. You can use Purpletree Store Survey extension for knowing your Opencart store service feedback and product quality.
How Purpletree Store Survey work
First of all, you can install Purpletree Store Survey extension with the help of the user guide. In user guide Installation process explains step by step, definitely user guide is helpful for the installation process.
After success full install you can see Purpletree customer survey plugin option show in the left side navigation menu. Click on it you can see two option Survey details and Survey Report. In survey details, you can add a question for the survey and In Survey report you can see survey result in form of chart and report.
How to add Question for Survey
Click on Purpletree Survey in the left side Navigation menu and select Survey details and click on it. You will reach on the Surveys page.
For add Question for survey click on add button. You will reach on Add Question from the page. Here you can enter your question and question answers in the form of option and choose question status. After that, click on the save button top right corner. Thereafter, you will reach the Question list page.
To edit a question, click on the action button in front of the question (to be edited). Here you can edit the question, add a new option, edit option and you can delete option and also you can change the question status.
How to view Survey result
Click on Purpletree Survey in the left side Navigation menu and select Survey Report and click on it. You will reach on Survey Report. For show result in form of chart click on Survey Chart tab.
For show result in the form of the report click on Survey Report tab
How to set Survey
You can add/remove the right column by adding/removing the path ‘extension/survey/survey’ from account layout. Go to ‘Design->Layouts’ edit account layout, add a new root and enter the path ‘extension/survey/survey’ and save the layout. To remove, just remove the path from the layout.
With e-commerce such a critical tool for businesses today, it’s vital to pay special attention to checkout page optimization. Checkout is a bottleneck where the customer makes the final decision — to buy or not to buy. That’s the question: will they complete the transaction, or will they abandon the cart?
Checkout pages are often a necessary hurdle for customers, and digital retailers should apply consistent effort to alleviate any potential stress for their online crowds. Not frequently cited among e-commerce development services, checkout optimization needs to be done cautiously by translating the best practices of marketing and usability into technology. This is subject to intense research, yet even minor tweaks can often produce considerable results.
Why Mobile Checkout Pages Are So Challenging
When mobile commerce first emerged, mobile apps and mobile e-commerce websites often followed the same basic design philosophy as desktop web apps. However, this legacy approach often resulted in poor user experience. Quite simply, small touchscreens work in a completely different way than a desktop screen and mouse or keyboard input.
Fortunately, the mobile app industry is constantly evolving. Facing a fundamental paradigm shift in how consumers interact with brands online, savvy developers started learning how to maximize e-commerce sales through incremental user interface (UI) improvements. Much of that comes down to optimizing mobile checkouts, the cornerstone of digital shopping.
The following is five key steps to take in order to model mobile checkouts according to consumers’ expectations.
1. Understand the Difficulties of Touch Input on a Small Screen
With only a few square inches of real estate, the touchscreen presents numerous UI challenges. The screen is too small and the human finger too thick and imprecise. Buttons and links can be next to impossible to click without cumbersome zoom-in.
Fortunately, this yields some straightforward solutions. Web designers can make buttons easier to click by enlarging them. Buttons should be at least as large as the average thumb pad, and there should be nothing else clickable nearby. As for links, it’s best to avoid them altogether: It’s easier than making them click-friendly.
2. Design for One-Handed Input
It’s rare that people interact with their phones using both hands at once — most of the times because the other hand will be holding a latte. Jokes aside, designing for one-handed input is important if you want to maximize the value of each consumer interaction.
However, one-handed use presents special challenges because the area that the user’s fingers can reach is rather limited, usually to about two-thirds of the screen at most. For this reason, you should first identify the most easily reachable areas and put the critical UI elements there.
3. Optimize Forms for Mobile Use
When possible, forms should be avoided during mobile checkout. One way to address this is to enable auto-fills. Have customers sign up and complete their account information so that their data, including payment, shipping, and personal details, can be automatically filled in. This way, mobile checkout can be reduced to a few simple clicks.
4. Consider Multiple Checkout Pages
When it comes to desktop web apps, the fewer clicks the better. However, with mobile apps, more pages may actually be a benefit. That’s because it’s more difficult to scroll with a smartphone than it is with a PC. While it’s important to keep pages and clicks to a minimum, it’s even more important to eliminate scrolling on mobile e-commerce sites.
To the greatest extent possible, each e-commerce page should contain all the necessary content on the first screen. If more than one screen’s worth of information is needed, it’s best to put it on another page for better navigation.
5. Always Keep Mobile UX in Mind
Front-end technologies evolve as web developers and user experience (UX) designers discover new ways to increase conversions across devices and platforms. With all this accumulated knowledge, it should be easier for your e-commerce development team to grasp mobile UX specifics.
Consider guest checkouts. From a retailer’s point of view, every account signup is great. Once the retailer has a customer’s email, they can send out newsletters and lure the customer with attractive personalized offers. In the long run, customers benefit as well. Not only do they get deals but they can also use auto-fills and check out much more quickly.
Another important consideration is security. Numerous e-commerce websites have suffered serious security breaches that have exposed consumer data. Moreover, people are naturally reticent when it comes to their payment and personal information. By displaying security badges as well as enabling HTTPS and encryption, an e-commerce provider can help customers feel safer.
Conclusion: Mobile Checkout Optimization Pays Off
With sales volumes growing globally, mobile e-commerce cannot be ignored. Smartphones are here to stay, and while they present new opportunities, they also offer distinct challenges. As such, every aspect of mobile user experience should be closely examined and optimized, with mobile checkout being at the center of such optimization efforts.
In the Purpletree Magento Multivendor seller can create multiple products and can add any information for the product they want and customers will come to the website and check if that product is enabled then they can buy that product using Website payment method flow and according to products. Products of the website can be in different categories as assigned by admin but when it comes to sellers product then admin has the option to give access for categories admin wants that sellers can add products to that particular category only or different sellers can add products in their respective category only.
First admin has the option to assign global categories in Purpletree Magento multivendor extension settings so that any seller can add products in that particular category only. Means if there are 10 categories in the website and admin wants that any seller can come and add products in only 1–2 categories then admin can give access to only 1–2 categories for all seller so that seller can add products in that particular categories only and not other than that. Admin can set that in Admin > Marketplace > Setting > Configuration > General Configuration > Allow Category for seller.
The second option admin has is that admin can give access to only particular categories for each seller. In this way, each seller adds products in different categories. Means one seller can add products in Men section only and others can add products in the Women section only. So this way each seller has different options to add their products and admin has only access to assign which category for which seller to assign. Admin can also give access to all categories for all sellers using this option. There is not any restricting but more flexibility.
For admin to assign categories for different sellers Login to admin panel > Marketplace > Manage Seller. Then Select any seller from the list and select Edit Action in front of them.
Then Click on Assign Category Tab and select category from the tree. Here admin can select any parent for child category to give access to the seller. While giving access please be assure to give access to parent also if you are giving access to any child category so that when the seller adds a product they can see the child category only if there is access to the parent category. Men in the below case if you are giving access to Jackets Category in Men then be assured to give access to Men, Tops, and the Jackets category for the seller to see Jackets category.
After selecting all the categories to be sure to save the data on the click of Save Customer/Save and Continue Edit.
So on Seller side when seller adds or edit product they can see Jackets categories and can assign as many products they want in that category.
More details of Multivendor Marketplace for Magento 2 can be found here.
In Purpletree Opencart multivendor Marketplace has one of the best functionality called commissions. In commissions, the admin and seller can share from the vendor/seller product purchase which means the admin will receive some amount of seller product purchase. For example — If the commission is set 5%, price of the product for vendor X is 100 then 5 would be the admin share and the rest 95 is the vendor/seller part in the order.
Admin can set the global commission from the Opencart multivendor Marketplace settings. The Opencart multivendor commissions have some more ways to set the commissions like category commissions.
Permissions set by admin for seller to manage order status?
Admin can give permission to the seller to manage their order status from the Purpletree multivendor > Settings > Allow seller to manage orders. When a customer orders a product of a seller if the commission is set by admin then the commission will apply when the order status is complete.
With the help of this functionality, the seller can able to manage the order status of their own products and also notify them about the current status of the order.
How admin manage order status of seller products?
Whenever a customer order’s the product of a seller if the commission is set by admin then the commission will apply when the order status is complete.
The first seller can change order status (set complete). after that admin can changed order status (set complete).
To complete the order status to sellers products by seller, Logging as seller goto seller option menu click on Orders >select “All” from “Seller Order status” and ”admin order status” click to “Filter button” then click to “View” button
Click to status block then scroll down below select status to complete because if Complete is select in “Admin Status for which Commission will calculate” dropdown from Opencart multivendor Extension settings then need to complete the order status in seller order status also save “Add History” that means that the seller order status is completed.
To complete the order status of seller products by admin goto Purpletree Multivendor > Seller Orders > select “All” from “Seller Order status” and ”admin order status” click to “Filter button” then click to “View” button.
Click to status block then scroll down below select status to complete because if Complete is select in “Admin Status for which Commission will calculate” dropdown from Purpletree multivendor settings then need to complete the order status in seller order status also save “Add History” that means that the seller order status is completed.
Now there is a need to complete the admin order status of admin to generate commission on the seller order status. Go to Sales > Orders > click to view button.
Now the commission will be visible in the “Seller Order” Commission column as highlighted below.
More details of Purpletree Opencart Multivendor marketplace can be found here.
The Best Solution for the same is Purpletree Mobile Application for Opencart 3 and Purpletree Mobile Application for Magento 2. Our ready to build apps are the most convenient way for any CMS website which is built on Magento or Opencart to create their apps from us and publish it on the app store instantly.
In the Digitized world, the Mobile app is a must for any business to survive so that any user who wants to buy anything can buy it with the click of a button from their mobile phones. Mobiles are a necessity for every individual, be it a child or an old person. It becomes a need for everyone, for a child it is to study, buy online books or games, for older people, to buy home glossary to furniture.
CMS(Content Management System) provides the platform for seller to sell their products from the website just by installing it on server and user opens the website and for any eCommerce website, the user buys stuff online from the website. Magento and Opencart both are great CMS and do their purpose excellently. For Sellers to sell their products on Opencart and Magento mobile app you can even use Purpletree Marketplace Multivendor for Opencart and Magento, which allows the seller to register on the website and start selling their products from the admin store, no need to set up their website or install CMS (Magento or Opencart).
Now comes the real-life scenario, a person’ works from morning to evening doesn’t have time or you can say less time to open up the laptop or computer and open up the website and search for stuff they want to buy it, rather they prefer mobile apps for the purpose, so that even in a day during work, if they got any spare time or even 5–10 minutes they would like to use it wisely, they would prefer to open up mobile apps on their phone and buy the stuff within a minutes from mobile apps.
Mobile apps are designed in a such a way that if any user comes to them, they load quickly and user would see meaningful content which would be easily readable on phone and buy the stuff from app without having to browse all the website and finding all the irrelevant stuff which is not much useful and hard to read in small screens of phones.
The Best Solution for the same is Purpletree Mobile Application for Opencart 3 and Purpletree Mobile Application for Magento 2. Our ready to build apps are the most convenient way for any CMS website which is built on Magento or Opencart to create their apps from us and publish it on the app store instantly. No need to do any hard coding. All the content comes on the mobile app is coming from API’s we have built specifically for Opencart and Magento.
The Best part of this is that website admin just has to purchase the app from our website and open a ticket with us for communicating further details regarding the app. Just sit for a while and we will build an app for you without any further hassle for you. We might need Logo to be used in the app and Splash screens required for the app. Or we will use it as in your website logo
Please make sure that before purchasing the app, you already have installed Magento mobile app or Opencart native mobile app on the server and the website and admin for the same is fully working. With the Purpletree Mobile app, you can manage the app data right in front of you from the admin. Open the admin for your website and change the Slides of the slider on the homepage, with just a click away as you change it for a website. We will provide you full documentation regarding the same for further changes which could be useful for day to day changes and can be done right from the admin only.
Some of the following Features of Purpletree Mobile app are-
Supports Opencart and Magento Multi-Vendor Extension, with seller and buyer features available in the app.
Completely white-label application, having only your brand, logo and name.
All data comes from your existing OpenCart website/Magento Website, and application adds its own data also (like banners, etc.) using an admin section of OpenCart/Magento.
This is a hybrid mobile application. If you have the source code, it can be launched on all platforms like Google Play Store, Apple Store, Windows Store, etc.
Home page with multiple banner blocks available
Featured products on home page
Special products on home page
Category icons on home page
Custom logo according to business
Custom unlimited color schemes available
Custom pages for policy
Custom footer
Category listing page
Product details page
Cart page
Search page
Check out page
User dashboard
User profile
Login page
Forgot password
Publishing the Application
We will build the application for you and publish it on the PlayStore.
After purchase, open a ticket from our helpdesk and we will provide your branded mobile application.
You need to have an already existing OpenCart v3/Magento 2 based website. If you do not have that, it can be set up as an additional task.
If you want to publish using your play store developer account, you can request for the same also.
Opnecart social login allows users to connect with one click to your opencart 3.x and 2.x by using their social network accounts. opencart social login extension allows to login and registers with 30+ social networks for opencart. Gather rich information (age, gender, phone numbers, etc.) about your users without requiring them to fill out any forms. Social login increases your opencart registration rate by simplifying the registration process for new users and provides permission-based social data retrieved from the social network profiles. Social login extension saves the time of users when user login and register on the website. When a user wants to register on website then the user will have to fill some data for register and login website. This way is very easy to login and registers your website.
Advantage of this Extension:
1. Gather rich information (age, gender, phone numbers etc) about users without requiring them to fill out any forms.
2. Social media login extension allows users to connect with one click to your opencart by using their social network accounts.
3. Increases your opencart registration rate by simplifying the registration process.
4. Social Login is fully compliant with all European and U.S. data protection laws.
5. opencart social login is fully customizable and seamlessly integrates with your existing login/registration system.
6. Do not take the risk of loosing any users or customers due to outdated social network integrations.
Major features of this extension:
1. Login with the most popular 3 social media(Facebook, Google, and Twitter).
2. Configure each social account by setting up a few authorization details.
3. You can set enable/disable social media account.
4. One-click registration/login.
Installing process:
1. Go to “Extensions” -> “Extension Installer”.
2. Upload the file purpletree_social.ocmod.zip.
3. Go to “Extensions” -> “Modifications”. You should see an entry for this — “Purpletree Social login for OpenCart3.x”.
4. Click on the Refresh button, on the top right of the page.
5. Go to “System -> Users -> User Group > Edit Administrator”.
6. Set access and modify permissions for ‘extension/purpletree_social_login ‘.
7. You see the ‘Purpletree social login’ menu just above the Reports menu.
The callback URLs shown on this page can be added to the Facebook/ Twitter/ Google app.
Following are the callback URLs to be added in the respective apps: