Monday, September 16, 2019

In Opencart multi-vendor When admin can get Commission?


In Purpletree Opencart multivendor Marketplace has one of the best functionality called commissions. In commissions, the admin and seller can share from the vendor/seller product purchase which means the admin will receive some amount of seller product purchase. For example — If the commission is set 5%, price of the product for vendor X is 100 then 5 would be the admin share and the rest 95 is the vendor/seller part in the order.
Admin can set the global commission from the Opencart multivendor Marketplace settings. The Opencart multivendor commissions have some more ways to set the commissions like category commissions.

Permissions set by admin for seller to manage order status?

  • Admin can give permission to the seller to manage their order status from the Purpletree multivendor > Settings > Allow seller to manage orders. When a customer orders a product of a seller if the commission is set by admin then the commission will apply when the order status is complete.
  • With the help of this functionality, the seller can able to manage the order status of their own products and also notify them about the current status of the order.

How admin manage order status of seller products?

  • Whenever a customer order’s the product of a seller if the commission is set by admin then the commission will apply when the order status is complete.
  • The first seller can change order status (set complete). after that admin can changed order status (set complete).
  • To complete the order status to sellers products by seller, Logging as seller goto seller option menu click on Orders >select “All” from “Seller Order status” and ”admin order status” click to “Filter button” then click to “View” button

  • Click to status block then scroll down below select status to complete because if Complete is select in “Admin Status for which Commission will calculate” dropdown from Opencart multivendor Extension settings then need to complete the order status in seller order status also save “Add History” that means that the seller order status is completed.
  • To complete the order status of seller products by admin goto Purpletree Multivendor > Seller Orders > select “All” from “Seller Order status” and ”admin order status” click to “Filter button” then click to “View” button.
  • Click to status block then scroll down below select status to complete because if Complete is select in “Admin Status for which Commission will calculate” dropdown from Purpletree multivendor settings then need to complete the order status in seller order status also save “Add History” that means that the seller order status is completed.
  • Now there is a need to complete the admin order status of admin to generate commission on the seller order status. Go to Sales > Orders > click to view button.
  • Now the commission will be visible in the “Seller Order” Commission column as highlighted below.
More details of Purpletree Opencart Multivendor marketplace can be found here.

Friday, September 6, 2019

Purpletree Multi-vendor Mobile app for Magento and Opencart

The Best Solution for the same is Purpletree Mobile Application for Opencart 3 and Purpletree Mobile Application for Magento 2. Our ready to build apps are the most convenient way for any CMS website which is built on Magento or Opencart to create their apps from us and publish it on the app store instantly.

In the Digitized world, the Mobile app is a must for any business to survive so that any user who wants to buy anything can buy it with the click of a button from their mobile phones. Mobiles are a necessity for every individual, be it a child or an old person. It becomes a need for everyone, for a child it is to study, buy online books or games, for older people, to buy home glossary to furniture.
CMS(Content Management System) provides the platform for seller to sell their products from the website just by installing it on server and user opens the website and for any eCommerce website, the user buys stuff online from the website. Magento and Opencart both are great CMS and do their purpose excellently. For Sellers to sell their products on Opencart and Magento mobile app you can even use Purpletree Marketplace Multivendor for Opencart and Magento, which allows the seller to register on the website and start selling their products from the admin store, no need to set up their website or install CMS (Magento or Opencart).

Now comes the real-life scenario, a person’ works from morning to evening doesn’t have time or you can say less time to open up the laptop or computer and open up the website and search for stuff they want to buy it, rather they prefer mobile apps for the purpose, so that even in a day during work, if they got any spare time or even 5–10 minutes they would like to use it wisely, they would prefer to open up mobile apps on their phone and buy the stuff within a minutes from mobile apps.
Mobile apps are designed in a such a way that if any user comes to them, they load quickly and user would see meaningful content which would be easily readable on phone and buy the stuff from app without having to browse all the website and finding all the irrelevant stuff which is not much useful and hard to read in small screens of phones.

The Best Solution for the same is Purpletree Mobile Application for Opencart 3 and Purpletree Mobile Application for Magento 2. Our ready to build apps are the most convenient way for any CMS website which is built on Magento or Opencart to create their apps from us and publish it on the app store instantly. No need to do any hard coding. All the content comes on the mobile app is coming from API’s we have built specifically for Opencart and Magento.

The Best part of this is that website admin just has to purchase the app from our website and open a ticket with us for communicating further details regarding the app. Just sit for a while and we will build an app for you without any further hassle for you. We might need Logo to be used in the app and Splash screens required for the app. Or we will use it as in your website logo
This image has an empty alt attribute; its file name is mobile-app.png
Please make sure that before purchasing the app, you already have installed Magento mobile app or Opencart native mobile app on the server and the website and admin for the same is fully working. With the Purpletree Mobile app, you can manage the app data right in front of you from the admin. Open the admin for your website and change the Slides of the slider on the homepage, with just a click away as you change it for a website. We will provide you full documentation regarding the same for further changes which could be useful for day to day changes and can be done right from the admin only.

Some of the following Features of Purpletree Mobile app are-
  • Supports Opencart and Magento Multi-Vendor Extension, with seller and buyer features available in the app.
  • Completely white-label application, having only your brand, logo and name.
  • All data comes from your existing OpenCart website/Magento Website, and application adds its own data also (like banners, etc.) using an admin section of OpenCart/Magento.
  • This is a hybrid mobile application. If you have the source code, it can be launched on all platforms like Google Play Store, Apple Store, Windows Store, etc.
  • Home page with multiple banner blocks available
  • Featured products on home page
  • Special products on home page
  • Category icons on home page
  • Custom logo according to business
  • Custom unlimited color schemes available
  • Custom pages for policy
  • Custom footer
  • Category listing page
  • Product details page
  • Cart page
  • Search page
  • Check out page
  • User dashboard
  • User profile
  • Login page
  • Forgot password
Publishing the Application

  • We will build the application for you and publish it on the PlayStore.
  • After purchase, open a ticket from our helpdesk and we will provide your branded mobile application.
  • You need to have an already existing OpenCart v3/Magento 2 based website. If you do not have that, it can be set up as an additional task.
  • If you want to publish using your play store developer account, you can request for the same also.
  • Source code is also available with extra cost.

Tuesday, September 3, 2019

How Purpletree Social Login extension work in Opencart?

Opnecart social login allows users to connect with one click to your opencart 3.x and 2.x by using their social network accounts. opencart social login extension allows to login and registers with 30+ social networks for opencart. Gather rich information (age, gender, phone numbers, etc.) about your users without requiring them to fill out any forms. Social login increases your opencart registration rate by simplifying the registration process for new users and provides permission-based social data retrieved from the social network profiles. Social login extension saves the time of users when user login and register on the website. When a user wants to register on website then the user will have to fill some data for register and login website. This way is very easy to login and registers your website.

Advantage of this Extension:

1. Gather rich information (age, gender, phone numbers etc) about users without requiring them to fill out any forms.
2. Social media login extension allows users to connect with one click to your opencart by using their social network accounts.
3. Increases your opencart registration rate by simplifying the registration process.
4. Social Login is fully compliant with all European and U.S. data protection laws.
5. opencart social login is fully customizable and seamlessly integrates with your existing login/registration system.
6. Do not take the risk of loosing any users or customers due to outdated social network integrations.

Major features of this extension:
1. Login with the most popular 3 social media(Facebook, Google, and Twitter).
2. Configure each social account by setting up a few authorization details.
3. You can set enable/disable social media account.
4. One-click registration/login.

Installing process:
1. Go to “Extensions” -> “Extension Installer”.
2. Upload the file purpletree_social.ocmod.zip.
3. Go to “Extensions” -> “Modifications”. You should see an entry for this — “Purpletree Social login for OpenCart3.x”.
4. Click on the Refresh button, on the top right of the page.
5. Go to “System -> Users -> User Group > Edit Administrator”.
6. Set access and modify permissions for ‘extension/purpletree_social_login ‘.
7. You see the ‘Purpletree social login’ menu just above the Reports menu.
The callback URLs shown on this page can be added to the Facebook/ Twitter/ Google app.
Following are the callback URLs to be added in the respective apps:
Facebook:
<base_url>/index.php?route=account/purpletree_social_login/fblogin.
Google:
<base_url>/index.php?route=account/purpletree_social_login/googlelogin.
Twitter:
<base_url>/index.php?route=account/purpletree_social_login/twitlogin
After creating all apps and entering the API key data in extension, social login shows on.
login page:
Extra benefits with buying Purpletree Social Login:
1. User can login the most popular 3 social media (Facebook, Google, and Twitter) without gathering extra information requiring.
2. You can set enable/disable social media account.
3. One-click registration/login.

Thursday, August 29, 2019

Install Purpletree Magento Extension using composer


If you have purchased any Magento extension from PurpleTree Magento Multivendor, you can install that extension using the composer. Installing the extension using the composer is an easy process but looks complicated as it involves CLI.
Using CLI (Command Line Interface) you can perform a numerous operation; few of the important operations are as below which every Magento user needs.
  • Installing Magento and Extensions
  • Upgrading the Magento and Extensions to the latest versions.
  • Uninstalling any module or extension.
  • Clearing the cache.
  • Reindexing the indexers of Magento to keep data up-to-date.
  • Deploying Static Content view files.
  • Enable and Disable any modules
  • Compiling the code.
  • Change mode of Magento i.e. developer or production
  • Put the website on Maintenance mode.
  • And many more…
Here we will discuss installing any extension using Composer using CLI in steps.
Note — You must have purchased the extension from PurpleTree Magento Marketplace before proceeding further

Step 1

Please make sure you have installed Magento 2, if not install it using CLI as explained in Install-cli or from Magento Setup Wizard by Downloading the Package.

Step 2

Open SSH Shell Command-Line and Enter Following Command, in the example; we are installing Purpletree Marketplace Extension. So if you want to install any other extension just put their vendor name in place of purpletree and module name in place of marketplace
It will ask for Authentication Credentials for your Magento Marketplace account. For that Login to your account and go to Access Key area — Access Keys/ and copy Public key and Private Key.

Step 3

Create a New Access key if not already there for Magento 2.

Step 4

Enter Your Username as a public key and password as a private key. These are the credentials using which you must have purchased the extension.

Step 5

After Entering the Credentials your extension will be downloaded now you just have to install the extension by running Upgrade Command. And your Extension is ready to use.
php bin/magento setup:upgrade
So Using the Above steps you can easily install any Magento Extension which you have purchased from Magento Marketplace. Just make sure you have used the same credentials when you bought your extension and using it the same on the shell when validating it using the composer.
For the next steps how to configure Purpletree Marketplace extension or any other extension follow their respective documentation.
More details of Multivendor Marketplace for Magento 2 can be found here.

Tuesday, August 27, 2019

Economic Hosting: Perks of having a dedicated hosting provider

Data over the internet is the prime reason for the argument of culling the perfect choice of data hosting service. With the growth of technology, that’s leaping exponentially raise the obligation to compose the organization’s presence on the global platform. Each organization aims to reach the level of higher productivity to escalate their occupancy on the web through the optimization at a faster rate. Better the RAM, Better the reach to find the zenith of growth.

Embrace the server host judiciously:

Once, the organization ranging on the scale is ready to outcast their establishment. It becomes quite the obvious job, to choose the server for hosting its services. The numbers of associations are working in the favor of catering the services at the range of figures. These ranges are distributed, varying the factors on expenditure, size of the organization, span of targeted audience and size of accessing memory. The shared server hosting, VPS server hosting, dedicated server hosting and cloud server hosting are some prevailed names in their field of domain. Each server involves their own set of pros and cons dealing with the requirement of a particular organization. If the organization is having fine huddle in numbers with the need for limited access to memory, it is advised to move with choice of Shared or VPS server hosting depending on monetary stature. But if the organization is acquiring exemplary crowd and targeting a million audiences over the month or the week, it is further commended to move with Dedicated or Cloud server hosting.

Why the organization can pitch for the dedicated hosting service?

The dedicated servers are usually employed by the matured organizations aiming to project its data over a bank of the sum. The flow of data is maintained at the operational rate. The audience and inherits of organization demand the speed inflow of text. In that scenario, the dedicated servers are employed to perform the role.
The regulation of bulk mail and transaction emails is subjected to the dedicated email server. It gives the whole package to the organization to keep track of data and co-related activities. The physical server belongs to an only particular entity either its website or sets belonging to the same. It swings with the requirement of the network without sharing the resources with third-party. It also reduces the risk of bringing the website down by the fall efforts of neighboring sources.

Perks to gain through dedicated server hosting for inflation in business:

The organization aiming for inflation in business can be attained by choosing appropriate server pertaining to the crowd involved. The following perks should be kept in the head in favor of the dedicated server hosting to increase the views and values to the business:

1. Isolated server source:

It provides a separate podium for carrying out the context on the complete server. It bars the intervention of a third party website on the same server. It further bolsters in clearing the cluttered inbox with the help of a dedicated email server as compared to cheap managed VPS hosting, making it easier to carry out the operations.

2. Unique identifier- IP address:

Each dedicated server’s exhibit unique IP address as their unique identifier. Contrary to Shared hosting service, the IP address is firmly secured from spam and malicious sources. Whereas, in cheap managed VPS hosting service, it demands the need for further customization at the risk from neighboring servers working on the single physical device.

3. Upkeep expense mitigation:

The purchasing cost of dedicated server hosting is much stiff than other grounded server hosting services. Once, the server is brought to the resources, it helps in cost mitigation. The service provider handles all overhead purchases without giving the restriction of customization cost. It also mitigates the challenges for lack of resources by providing a medium for server plans, managed and unmanaged dedicated server, window and Linux dedicated server and clear the floor for bulk emailing through dedicated email server as compared to the services provided by cheap managed VPS hosting server and shared hosting server.

4. Flexibility:

The dedicated server provides flexibility as compared to cheap managed VPS hosting server in contrast to choosing the hardware and software of your own choice. The organization is offered with a variety of brands for hardware and supported control panel from the provider’s end.

5. Better room for accessing the memory:

The high price of server gives higher hopes on the results as well. The dedicated servers generally give permit on providing a better spot for RAM as compared to other servers. It also offers scale on the internal storage of the system.

Monday, August 26, 2019

Raise a ticket in Magento 2 help desk extension


Whenever any customer login into any Magento website, there may be a case where he/she might want to contact the admin regarding account, order detail, or any other feedback and wants a reply from admin for the same. In most of the cases, this functionality is must required when a customer wants to raise any request regarding the order and wan to track the admin support for the same. For this purpose Magento help desk extensionis a powerful extension to fulfill the above purpose and a lot of other accessibilities also.
For any user to raise request using this extension, the first case is he/she must be registered and approved customer on the website means he/she must have all the access for their user account as a customer.

Raising a request using this extension is a simple process, the customer just has to login to their account, then go to their account page, where they can see a new menu item on left navigation as “Help Desk”. Click on the link and from there customer can see the entire previews request raised by them.


From the above page, as a customer sees all the previews support tickets, they can create a new support ticket from “ Magento Support Ticket” button. Click on the button and you will see the new form which will ask for the following information.

Subject — In here enter the subject for which you want to raise enquiry like in the example we took “Need Installation Support”. It is just like any Email subject to understand the admin what is this ticket about.

Full Description — In here you can explain in detail what customer wants from admin/ store owner. Write full info whatever you think would better explain the purpose of this ticket. Like, in this case, we took an example as “I got the Product on time, but still waiting for the installation guy to come and install my AC”. So like we said it could be related to order or anything else here it is order related, the customer just needs communication from the admin regarding the same.

Priority — This is the additional filed for the customer to set. Like, in this case, it is installation support that customer want so its priority is high, in some cases customer just wants to give feedback or suggestion which would be better if implemented, in that cases customer can select priority to Low or Medium, Please note that admin can always change the priority from their side.

Department — Customer can select a department from the list, this is another optional thing for the customer, admin can always change the department from their side.

Order No — This is again optional field if the ticket is regarding any order just mention order number else leave it blank.

Attachment — Customer can also send some pictures or document to better illustrate the issue. Following formats are supported which customer can attach — pdf, doc, Docx, Xls, xlsx, CSV, txt, jpg, jpeg, png, gif. No other format file to be attached is not supported.
After filling all the information just click on Submit button to send this ticket to admin, and a customer can always track and reply the ticket by selecting the ticket from the listing page.


More details of Multivendor Marketplace for Magento 2 can be found here.

Wednesday, July 31, 2019

Why Custom CRM Is Good For Business In 2019


In spite of being a comprehensive and versatile system, no CRM can fulfill the needs of everyone. You need customization and integration of it to optimize the system and to offer a customer-friendly experience to the end-users. Qtriangle is the leading name in CRM Customization and Development services. Without customers, businesses are without profit. In addition to that, the satisfaction of customers is an indication of more profit for a business. For a business to attain a certain level of recognition, referral, and credibility, there has to be a healthy relationship and level of communication between the business organization and its customers.
The success of any business lies in the healthy management of its relationship with its customers. Due to the constant increase in customers, technology has brought about a system through which this relationship can be managed.
Technology today has made all of this much easier with the existence of top web development companies. These companies aid in the creation of software that can promote both the interest of the organization and at the same time meet the satisfaction of customers. A CRM isn’t the product of a particular web development company but rather an initiative of many top web development companies. CRMs so far have proven to be the most efficient system and software that has combined the improvement and management of customers, gaining popularity and having a lead in the business world today.
“CRM” stands for Customer Relationship Management. This system refers to every tool, technology, strategy and technique applied by business organizations in order to attract, develop and maintain customers. This ensures the possibility and productivity of interactions that take place between organizations and customers. Software developed by web development companies aids the healthy development and strengthening of business via a strong, healthy and profiting relationship between customers and organizations.
With CRM, business organizations are able to gather vital information from different sources about their customers. Custom Relationship Management not only is a technological application but also is an intentional method applied by businesses to identify the needs of customers and also know more about their response to customers’ behavior regarding provided services. It’s also used as an algorithm to know the right tools to be used in building a stronger relationship with them. Though a technological formula, CRM is also a business principle that aids in efficient and effective relationships with customers.
One of the major goals of web development companies is to expand their influence and promote partnerships, yet they do all of this with the interest of their customers in view. Coming up with positive technological developments that would increase customer awareness of the availability of services are needed to be done. It likewise helps in boosting customer patronization and suggestions by creating diverse channels to deliver excellent services to their customers.
The world today is rapidly changing into a large global village and this is a reason why businesses need to introduce the adaptation of the CRM system. For any business to be able to stay at the top of the game, businesses should be ready to offer services that are in line with the times, the 21st century. Also, the services they render need to be tailored to the needs of the people.
Importance of a Custom CRM For Businesses in 2019
Custom CRM is extremely vital for businesses in 2019 and this is evident in the points below.
1. Every business organization has two sets of customers: The Profitable Customer and the Non Profitable Customer. With CRM development services, it will be easy for organizations to directly monitor the activities of their customers, thereby recognizing those that are of high value to the organization and those that aren’t.
2. With the initiation of CRM development services, customers are given a level of value by the organization due to the kinds of business they engage in. Then they can assign different managers to their respective customers.
3. Although CRM systems are used to maintain healthy relationships and economic interactions with customers, it can also be used for attracting new customers.
4. CRM development services help organizations save more profits, because manual work is minimal, which results in the employment of fewer staff to manage the affairs of the business. In addition to that, technologies needed for CRM systems are inexpensive, reliable and easy.
5. With a CRM system, customer satisfaction is at the maximal level, and with this, organizations are positively exposed to receiving more business and projects that result in higher profitability.
6. Using CRM development services makes your customers constantly loyal to you as a result of their interests being satisfied. With this, your partnership bond with customers increases thereby attracting more customers and increasing the growth of your business.
7. Customers enjoy a high level of privacy and security because every interaction that transpires between the organization and the customers is kept safe and well documented.
8. Due to the customer information being documented and stored in a single system, efficiency is guaranteed and less time is spent on paperwork.
9. Different processes are put to use to check customers interactions, conversations, and even purchases.
Utilizing Customer Relationship Management is an easy way to improve your business and to initiate new channels of business marketing in a profitable way. Web development companies have made it easy for businesses to cope with all their needs, ranging from productivity boosts, smooth interactions with consumers and establishment of successful business strategies.
With the variety of web development companies available, you can rest assured that the satisfaction of the customer’s interest is a vital goal that every business must meet. Hence, a custom CRM created for a business should be a high priority for any business owner. 
Learn more at: https://www.qtriangle.com/

Set subscription plan payment for the seller in Multivendor Marketplace for Opencart


Image result for payments

In the Opencart Multivendor Marketplace, the seller can payments via cash, cheque, bank transfers, at the desk, postal orders. In opencart multi-vendor extension, a seller can save and generate subscription plan after that seller can pay the amount of subscription plan.
The seller can use two Method of payment.
  • Offline payment.
  • Online payment.

Offline Payment method:

If grand total of a subscription plan is zero then subscription plan status will complete automatically and subscription plan will be enabled. If the grand total of a subscription plan is greater than zero. Seller status will visible pending. To enable subscription plan Seller must pay an amount of subscription plan via offline or online. Offline payments allow seller payments made via cash, cheque, bank transfers, at the desk, postal orders. After pay amount of subscription plan seller can send detail of payment to the administrator. After sending payment detail admin will enable subscription plan and complete payment status.
After save and generate invoice seller can view the following page. the seller can click on pay offline button for send payment history to admin.
After clicking on pay offline button seller can view the following page. the seller should fill all detail of pay subscription plan amount and click on enter offline payment information button. Seller payment history sent to admin.
After save payment history seller can view payment history. Now admin will complete subscription plan status.
the seller can view subscription status complete and enable subscription plan. after that seller can use subscription plan and add product, featured product, category featured the product and featured store according to the subscription plan.

Online Payment method:

in Opencart Multivendor Module seller can make payment online. An online payment system is an Internet-based method of processing economic transactions. It allows a seller and admin to accept payments over the web or over other Internet connections. The seller can make payment by PayPal online system. The seller should click on PayPal button for pay amount of subscription plan to the admin via online.
After click on Paypal button seller can view the following page for payment. The seller should fill detail carefully to payment.
After make payment seller will wait some time for payment status complete. As soon as payment status will complete then seller subscription plan will complete and enable automatically.
In the Opencart Multivendor extension seller can view online payment detail in payment history. The seller can view payment status. If the payment status is complete then seller subscription plan will complete and enable automatically. And payment status is pending then subscription plan will not complete. The seller can not use subscription plan In the position of pending status.

How to view the invoice and payment history of the subscription plan.

In the Opencart Multivendor Marketplace seller can view invoice and payment history. The seller should follow this step. If seller subscribes a subscription plan then the seller can view invoice button on the subscription plan.
First, go to a subscription plan and click on the invoice button. The seller can view all invoice of the related subscription plan.
And the second way of view seller invoice. The seller should click on the subscription invoice.
After that, you will see the following page and click on the view button.
As soon as you click on the view button. You will see the payment page. Now seller can make payment of subscription plan like before.
For More details please visit Purpletree software website:

Wednesday, July 17, 2019

How to add clipart in opencart custom product designer extension?

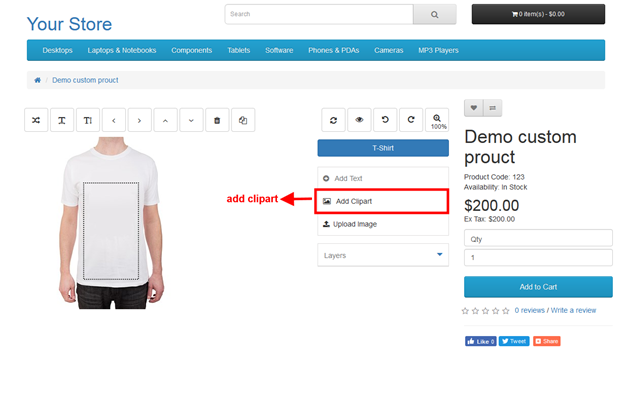
Custom Product Designer for Opencart is one of the best tools available to run your online printing portal for print any design and any text on a product like T-Shirt, cap, coffee mug, etc. Opencart Custom Product Designer provides may tool relate to text design and other related to clipart and image. Users can use these tools to make an attractive design on their selected product. Users can see his design on selected products by using “Preview Button”. Users can select any image or clipart image by using the “Upload image button” for the product. Users can also use available clipart by “Add clipart button”.

How Admin add Clipart

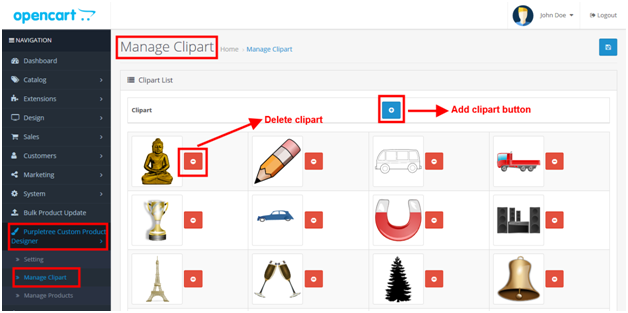
Clip art images may be either raster graphics or vector graphics. Admin can add Clipart Images which users can add on product. These will be predefined images added by admin as clipart images. To add a new clipart image, admin login in the admin panel and find the “Purpletree Custom Product Designer” menu in the navigation menu and click. After that, select the Manage Clipart menu. Thereafter user will reach on the “Manage Clipart” page.
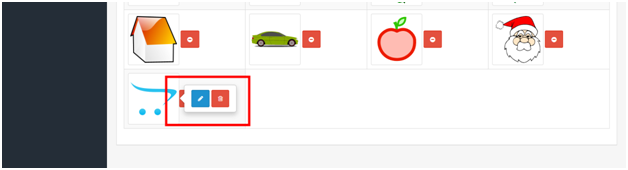
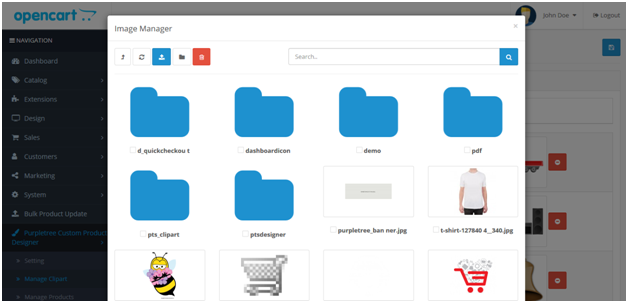
To add the new Clipart image click on Plus Sign in front of Clipart and then select the image and click edit to choose an image from File Manager.
After adding all the images, Clicks on Save Button on top right to save the Clipart images so the user can use them on the product.
To Delete the Clipart Image just click on the minus button in front of each image. No need to Click the Save button. The image will immediately be deleted once you click on the minus button.
Users can add different types of clipart images like jpeg, png, svg, formate. We have added many SVG images in out extension package.

How Customer use Clipart image

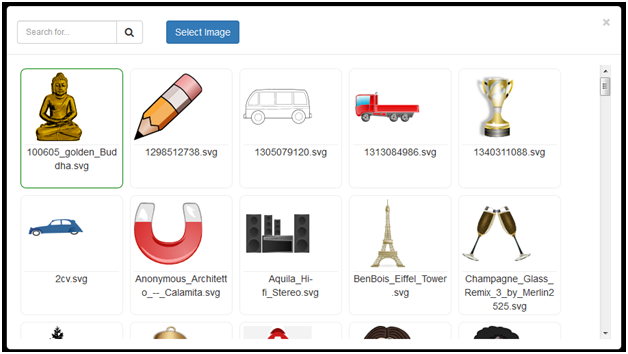
Customer use clipart image click on add clipart button. After click clipart popup is open. Add select clipart image by using a select image button and double click on the clipart image.
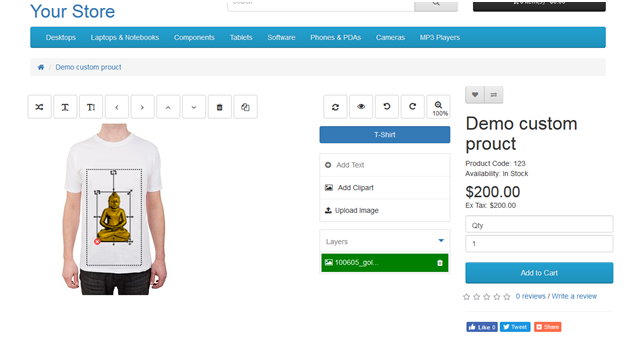
After the selection of images, the image automatically placed in a selected area on the product.
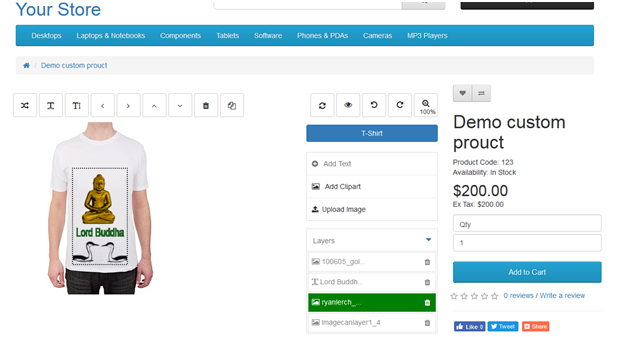
Customers can add multiple clipart images. Customers can also add other images and text.
Contact
PurpleTree Software LLP
D-242, Sector 63,
Noida, India-201307
Call Us:+91–120–4123–135
Connect With us: Linkedin | Twitter |Facebook

Monday, July 8, 2019

Opencart Multivendor bulk import products using MS-Excel by seller

This post is for you if you are a seller working on a multivendor eCommerce platform and if the seller wants to update the product which is to be done update product manually. It will very time to be consuming. Through Opencart multivendor extension, sellers can bulk update products on one click. Seller can update the product using .xls or .xlsx file.Seller wants to update large volumes of product data at one time by excel data file then should use it. This way is actually very easy to use and bulk product updates. Purpletree multivendor support multiple languages to update product data.
Features:
  • The seller can update bulk products at a time.
  • The seller can use.xls or.xlsx files, to update bulk products.
  • The seller can view changes in updated products in the frontend instantly.
  • The seller can update the product in multiple languages.

The seller should use the following step to update products

Login to your seller dashboard. Locate the seller panel. Click on Opencart bulk upload.
  1. The maximum upload time comes from the PHP server. It must be more if the file size is bigger to allow upload to complete successfully.
  2. The maximum file size must allow less than the PHP server size limit for update the product.
  3. Click on the Download template link.
If you need to update the product then you can download the sample excel data file.
The seller should use the exported data sheet for update products. If you want to change the data of any tab, then you have to fill the product id in the data and the General tab and“new product“column will leave empty.
If you do not know product_id then you can export data sheet with product_id and use it.
General Tab:
First, we will fill the valid product id in the product_id column. We can not leave the empty product_id column of the General tab even for a new product. This filed must be filled if inserting new product use any assumed product id in this field.
Data Tab:
First, we will fill the valid product id in the product_id column. We can not leave the empty product_id column of the Data tab. If any validation failed for any particular product id in this tab, no data will be updated for any of the tabs for that particular product id.
For Example: How to update product price?
The first seller should use the export data sheet and change price on the excel data sheet. Check on Overwrite existing Data and select language after that click on the import button.
Images Tab:
A product can keep one or more images so it cannot leave the empty product_image_id and product_id column. If you do not know product_image_id and product_id then you can export data and use it. The seller can update any existing image use exported data.
Discount Tab:
If you want to update discount any existing discount use exported data. To update any product data enter product_discount_id and product id. The seller can not update the product without product_discount_id and product_id.

Special Tab:
If you want to update the product any existing special-use exported data. To update any product data enter product_special_id and product id. The seller can not update the product without product_special_id and product_id.

Overwrite existing Data must check for update products. You can choose to select multiple languages for update products. Next click “Browse” to upload a single excel data file, navigate to the needed folder on your computer and select the file you want to upload. the file must be upload only in excel data sheet which accepts only .xls or .xlsx extension after that Click on the import button to update the product.
Contact
PurpleTree Software LLP
D-242, Sector 63,
Noida, India-201307
Call Us:+91–120–4123–135
Connect With us: Linkedin | Twitter |Facebook