Tuesday, November 19, 2019

Steps to follow if opencart shipping extension not visible on checkout

Opencart product shipping extension allows you to set shipping fee-based on Product / Category / Weight / Zip on a particular product or particular category. You can also set whether the shipping fee should be charged on per product basis, or on per order basis.
Shipping is an amount of a particular kind of cargo that is sent to another country on a ship, train, airplane, or another vehicle. With the help of Multivendor module admin can manage to ship according to the country, zip code of buyer’s address and product weight. Admin can set impact price on the shipping amount based on the country, zip code and weight. The buyer can see how the shipping amount fluctuates with the change in the county, zip code, and weight.

Due to installation not properly

You can check purpletree shipping properly install and status is enabled.

Due to Advanced shipping charge

If Shipping charge type set advanced then all field match with advanced shipping rates like price, weight, shipping country, shipping country zip code . for example you can order a product then ordered product’s price match with shipping rate price. Order’s product weight between shipping rates weight to and weight form. Order ’s Shipping country matches with shipping rates country. Order’s shipping zip code match with shipping rates zip code.
If customers order 2 products. First product detail and shipping detail match with shipping rates and second product detail and shipping detail not match with shipping rates then opencart shipping method not show on the checkout page.


Purpletree Shipping

If you are using purpletree multi-vendor marketplace in your Opencart E-commerce website then Purpletree shipping is best for you. Purpletree shipping is a shipping module of the opencart multivendor marketplace. Purpletree shipping provides different types of shipping for shipping products anywhere in the world.


Type of Purpletree shipping

· Product-wise

· Order-wise

Product-wise shipping

Product-wise shipping base on the product. In this type shipping rate will be applied on order per product means if 3 admin products are added in cart, then shipping rate multiple by 3 will be applied to cart. For example, If you can order more than one product then the shipping charge applies per product.

Order-wise shipping

Order-wise shipping base on order. In this type shipping rate will be applied per Order based if 3 admin products are added in cart, then a single shipping rate will be applied to cart. For example, if you can order more than one product the shipping charge applies once per order.

Type of Purpletree shipping charge

· Flat Rate Shipping

· Advanced Shipping

· Flexible Shipping

Flat Rate shipping

This is a traditional Shipping method, which means shipping charge which is chosen, will be applied to the cart according to shipping Type defined.

Advance shipping

This shipping charge will calculate from Shipping rates defined for each non-seller products. If No shipping charge is found even for 1 or more products in the cart, then the customer will not be able to checkout using Purpletree Shipping Method. Before using this shipping method make sure all shipping rates are defined.

Flexible shipping

In this, when a customer tries to checkout Non-Seller products, first for each product/order it will look for shipping charges from Shipping Rates. If not found then Flat Shipping charge will be applied

Shipping Charge

This Shipping charge will be used for Flat rate Shipping and Flexible shipping for Non-Seller Products.

Defining Advance Shipping Rates from Admin Panel

  • log in to Admin Panel and go to Purpletree Multivendor > Shipping Rates. From here admin can view a list of shipping rates that will be applied to order. Shipping Rates can only be added and deleted; the Edit option is not there to edit any shipping rate. Shipping Rates can only be added and deleted; the Edit option is not there to edit any shipping rate. Click on Add New from the top right. Admin can assign shipping Rates to any seller. Select Seller name from the dropdown in the 1st column. The first option in Seller’s name is N/A, which means this shipping rate will be applied to admin products. Select Country from the dropdown list. Enter Zip From and Zip To Range. If Zip code is not numeric then Zip From and Zip To must be the same to enable this shipping rate. Enter Price to be applied for this condition. In opencart weight-based shipping Enter Weight From and Weight To Range. Weight To must be greater than Weight from, but both can be set to 0 if not known.


The seller can also add Advance shipping rates by using the seller login.

Thursday, November 14, 2019

How to Manage Commission In Magento 2 Multi-Vendor Marketplace Extension

In Magento 2 Multivendor, How to calculate and manage commission on excel? Which formulae should I apply? How can I view the commission received by the admin or seller? Really difficult to track for e-commerce businesses and finding the best solution for it, is important. Calculating the commission of each product sell and maintaining its record is one of the hectic and tedious activities that every online business has to do.
The commission is a payment that can be made to an employee for his service or to a seller based on the terms and conditions of buying something through the seller. There are various kinds of commission models used in businesses, and they've seen both online and in physical storefronts.
Let’s have a quick look at the Magento multivendor extension offered by Purpletree Softwares for the commission calculation module, which helps to set, view and calculate the commission in a simple and reliable way.
  • After a successful installation of the Magento multi-vendor marketplace extension, we need to configure by logging-in via the admin panel to calculate and receive the commission.
  • Enter the commission for admin of seller products for the category of products to be sold. By default value is set to 10.

Seller Commission

In this seller page, we can view the commission receivable by admin for each completed order for this particular Seller.

How can an Admin view commissions

Through the admin panel, admin can view commissions of all the orders of sellers.

Add/Set Commission

This can be done by admin only who can assign the category of commission applicable to the products in a category.
  1. Add commission percent for each product sold by a seller.
  2. Expand the tree and click the radio buttons to select the category.
  3. Save commission.

Edit Commission

If the commission is to be edited, just click the plus sign of the tree and check the selected categories.

How and at when Commission would be calculated

The commission can be calculated after the completion of the order. The admin will get the commission automatically after the completion of the invoice and shipment of any order. There are three criteria for the calculation of the commission.
  1. Commission based on category basis: Here the commission is based on all the products of a category.
  2. Commission based on seller: Here the commission is based on the number of products sold by a seller.
  3. Commission on a global basis: This is applicable to all products mentioned on the website.
The commission is checked first on a category basis, then on a seller basis and then on a global. It means that the commission on the category basis is checked first but if that product is available in more than one category, the maximum value of the commission is selected. If the category commission is not properly defined, then the commission is paid according to the seller commission. If that too is not defined, then a global basis commission is considered.
The commission list will be updated only after the completion of an order.

Registration of a seller


If anybody wants to become a seller, then he has to create a customer id and then he has to select a checkbox to become a seller. After that, the person has to enter a URL for his store. Then the user has to click Create the Account. An Ajax call will check the uniqueness of the URL and then the account will be created.

Get This Extension at: https://www.purpletreesoftware.com/multivendor-marketplace-magento-2.html

Monday, November 11, 2019

Create an OTP message template in a two-factor authentication extension for Opencart


Two-factor authentication extension provides the functionally to authenticate the customer in a store. Opencart two-factor authentication app is very useful in many ways as if the information of users that admin has is appropriate admin can easily contact the user very easily through the mail and contact number. In that, we have provided the choice where the admin wants to show the popup.
There is a new update in the 2-factor authentication extension is that admin can create the default template of the message that is sent to mail and contact number to verify them.
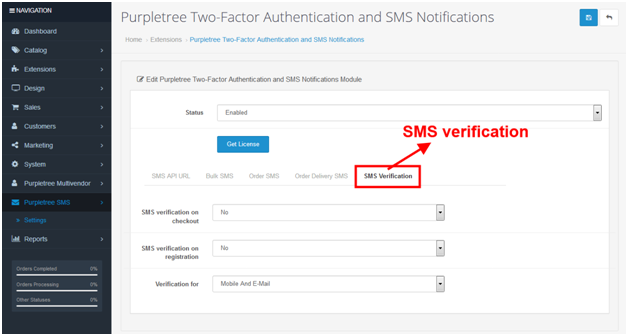
· In the first step to create the SMS template for OTP verification message go to > Admin > Purpletree SMS > Settings > SMS Verification tab.
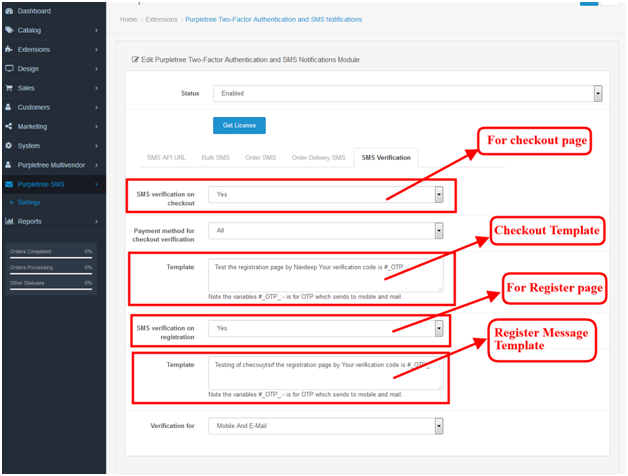
· In the second step you need to choose the page on which do you wants to show the verification popup (In which user have to enter the OTP which comes on email or mobile). There are two pages that are checkout and register page so, select the page from the dropdown on which do you want to show the popup.
· In the above screenshot as you can see the checkout template and register page template admin can define any template separately for both checkout and register page.
· There is a question arise how _OTP_ variable need use. Leave the _OTP_ variable constant where you wants to show the OTP number for example:
A sample template I have created-
Your verification code is _OTP_.
If you are having any issues with our DEMO STORE accounts please don’t hesitate to contact us by replying to this mail.
Then after the mail comes in the inbox like:-
If you are getting any issues after this then please raise the ticket at https://www.helpdesk.purpletreesoftware.com/.
Get this Extension at: https://www.purpletreesoftware.com/otp-2fa-opencart.html

Wednesday, November 6, 2019

How Admin can Add Blogs in Opencart Blog Pro Extension

Opencart Blog Pro extension provides Blog functionality to your Opencart store like Category functionality to create blog base of the blog category, comment management functionality to manage customer comment on blog and SEO URL functionality to fast search by customer. Opencart Blog Pro extension provides the Popular posts module and Latest posts module for show blogs. Tag management is a good functionality of this extension. Opencart Blog Pro extension also called Opencart blog module, Opencart blog extension, Opencart blog, and Opencart blog plugging.

How Admin can add blog Post

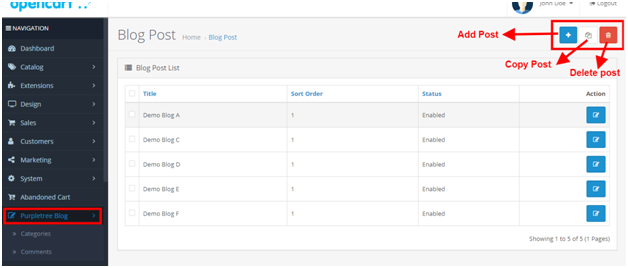
First of all successfully installed Opencart Blog Pro extension. If you want to create a blog based on category, then go to the Purpletree B log menu and click on it, after that select category and click to add category button, to add blog category. For add blog post go to Purpletree Blog menu and select posts and click on it, after that, you will reach on the blog post list page. Here you can add a new post, delete a post, edit post and copy post for creating a duplicate post.
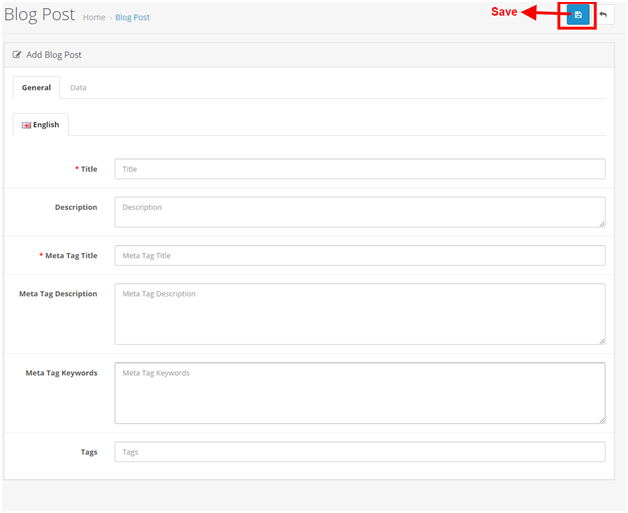
For create, new post click adds button and you will reach Add post page. Here fill all information related to blogging posts such as Title, Description, Meta Tag Title, Meta Tag Description, Meta Tag Keywords, Tags in General Tab and Categories, SEO URL, Stores, Image, Status, Author and Sort Order. Fill all information and click on the Save button.
In this form, some field is required then and click on the Save button. For edit, any blog post selects post in the post list and click on the edit button. Change information and click on the Save button.
For show blogs post, seller blog modules base of the user guide .after that your created Blog post-show on your selected layout page.
You can get Free Technical Support: 6 Months with buying Opencart Blog Pro extension.