Purpletree Software LLP is a software development company primarily involved in developing software for enabling eCommerce merchants.
We are an approved startup under "Startup India" program from Government of India.
Purpletree has built an Opencart mobile app that allows customers and sellers to browse the catalog and make purchases via the app. The mobile app is available for both IOS and Android which is compactable with IPhone/IPad and all Android Smartphone or tablets. The Purpletree Opencart mobile app has a lot of features that are very flexible for the customer to purchase on a store by using the Opencart multi-vendor mobile app. The Purpletree’s Opencart mobile application attracts people for homepage showing the banner slider, categories and featured brands as well. Customers can search for products, can select the product from sellers, Can select the products categories wise, add to wishlist, update account information, read reviews/provide the reviews to products, and also proceed towards an easy to use checkout process supporting the some specific payment gateways and shipping methods (both online and offline).
· Now, open your opencart mobile app.· Now, you need to login/signup with your account by clicking to the face icon.· Login with your account if you have, otherwise click to signup button. In this blog, we are assuming that you have an account with is associated with your store.· After login as a customer now, you need to add some products into your cart for checkout. So, find any product by searching then click on it then finally clicks to add to the cart button.· Click on the small bag icon button on the right side corner of the app.· Click to checkout button then you will redirect to the billing address page then choose your address or add your new address then click to Proceed to Shipping Details.· Then select the payment method then if you want to pay with PayPal then click to PayPal otherwise COD.· In the final step confirm your order.· Then finally you will see the success screen that means you have ordered the product.
Purpletree Opencart product designer plugin is a very powerful designing tool for products. Which is allowed to your customer to create a design on the t-shirt, labels, stickers, lettering, mugs, business card. Which is needs to be customized online products before ordering. When customers purchase a product on your website which can customize the online products before ordering and view product design after a complete customize process. There are different ways to your customers for product design.
This opencart custom product designer extension is very simple and user-friendly to customize your products. In this extension, customers can add different types of google fonts and use their font on online custom product designing. Your customer can add text with multiple properties and change text properties like text background color, text color, font size, shadow, text-align, rotation, line height, outline width, and outline color, horizontal and vertical scale, etc. this text properties make very attractive your design.
When customer add text on product image after you customer will get a text layer in the layers menu. Background image set to default. Background image, The customer cannot change. The background image can move up and move down. Customers can delete any layer of text, clipart, and imported image. You can enable any product on the admin side for customization using the Purpletree Opencart custom product design extension. This extension allows any user to design own graphics with a real image live product preview. Customers can generate the print for the order. Customers can complete themselves with graphic uploaded images.
If you want to add text on the product then you should click on the “Add text” link after that you will get a dialog box of text and text properties. When clicking on add text link you will get default text “Hello” on the product image. After selecting the layer, you can change the text of the layer.
Font family- Customers can change google font and make a stylish design.
Text color- Customers can choose a different color from the color picker and use a different color for product designing.
Font size- Customers can change font sizes according to the canvas area. If font size greater then canvas area text will hide in canvas.
Background color- Customers can change text background color easily. It does an attractive design.
Shadow- It is very powerfully featured to make product design. Shadow has different properties Right, Bottom, Blur and color.
Text style- Customer can change the text style of select layer like bold text, italic text and underline.
Text align- Customer can change text-align like left align, center align and left align which is change position of the text.
Horizontal scale- Customers can change the scale of text in horizontal.
Vertical scale- Customers can change the scale of text in vertical.
Rotation- Customers can move 360 angles.
Line height- Customer can change line-height. Line height is the distance between two lines.
Outline width- Customers can change the outline width for text only.
Outline Color- Customers can change the outline color of product design text.
Opencart custom product design extension is a very easy extension and user-friendly.
Purpletree Opencart option image and color swatches extension shows image to each option you want and show on the product page. In Front after select Option Image Product, the main image will change with option image. Product Option Image allows images for product option values and changing the main product image and list of additional product images on the product page in the customer section depending on selected options. Purpletree Opencart color swatch extension allows changing the main product image to a relevant option image on the option selected on the product page in the customer part. Some of your products may have multiple options. For instance, if you sell clothes in your online store, a sweater may come in red, blue, and green. You may want to create an option that displays a thumbnail picture of your sweater in the different colors when a customer chooses a specific color.
In this blog, we will configure a demo product of Opencart Option images and color swatches. To do this first go to Admin > Catalog > Options > Edit Checkbox or Radio or you can add a new option as well.
Now, Select the Option Checkbox or Radio from type dropdown then click to add button then Enter name, Upload the image then select the color from Color Swatches row then finally clicks to the add button.
Now, Clicks on to Product > Add/Edit any product then clicks to Options tab then Enter the name of your Option then select the Option value by clicking the add button then finally clicks to save button.
After following all the above steps if you are still getting the same issue you can please contact our helpdesk manage.
Admin:- In Purpletree Opencart multivendor Extension admin can assign the subscription plans on a particular product of seller products. There are two ways to assign a subscription plan. For this functionality seller need to subscribe plan or plans to add products in the subscription plan, Seller can only add products in the subscription plan according to the plan subscribed by them.
For this functionality seller and admin need some basic requirements.
Admin has to enable the subscription plan from Purpletree multivendor settings.
The seller has to subscribe to the one or more subscription plan which is created by admin.
If the seller is not subscribed to any plan then admin can assign a subscription plan for the seller from seller subscription > click to view button > assign new seller plan.
Way 1:-
Go to Purpletree multivendor > Seller Products > Edit.
Select the “vendor” tab. From here admin can assign the subscription plan to seller products, Seller featured product for category page and Featured product for carousel. Then assign a subscription plan to a product after that save all the change by clicking on the save button.
If the dropdowns of the subscription are not visible please make sure that you have enabled the subscription plan from Purpletree multivendor subscription plan and the seller has subscribed to the subscription plan.
Way 2:-
Go to Purpletree multivendor > Stores > Edit.
Select the “Add product” tab. From here admin can assign the subscription plan to seller products, when clicking to the checkbox of any product then the popup will open from the popup select the subscription plan to a product then click to save button.
Seller:-
For the seller, there are also two ways to assign a subscription plan to their products.
Way 1
The seller can assign the subscription plans for their products, featured products for carousel and featured products for category page on a particular product.
Go to Products.
Left side the column of featured product for carousel by which the seller can assign the subscription plan only for the carousel on the home page.
Right side the column of featured product for category page by which the seller can assign the subscription plan only for a category page.
Click to any checkbox to assign a subscription plan for any product.
Way 2:-
To assign a subscription plan to a particular product seller need to edit the product.
From here select the “Data” tab then assign the Subscription plan, a Subscription plan for the featured product, a Subscription plan for category featured product then clicks to continue button.
If the dropdowns of the subscription are not visible it means the seller does not have subscribed to the subscription plan.
When you try to register a seller or maybe try to edit product image or seller store image you might face an issue that page is not working properly the image popup is not opening properly on the front side of the website this issue is due to the Journal 3 theme. In Journal theme 3 there is a file called deffer.js which is conflicting with our Purpletree Opencart multivendor extension code. In this blog, we will focus on how to fix this issue in your opencart. Please make sure that the Journal 3 theme is configured properly. Journal 3 is the ultimate Opencart theme builder with best in class features and the most customizable design engine ever implemented in an Opencart theme, giving you total control over your store at any resolution. Journal 3 can be as simple and clean or as complex and colorful as you want it to be. Let’s fix the Purpletree Multivendor issue by Journal 3 theme.
The very first move to fix this issue that login to your Admin panel > Then open the Journal 3 sub-menus > System > Settings > Edit store.
After editing Your Store then clicks to Performance > Minifiers > Status (Turn On) > JS Defer (Beta) > Turn it Off >Then clicks on the save button.
Opencart abandoned cart reminder works when any visitors on eCommerce site like Amazon, eBay store, add items to their shopping carts and leave without completing a purchase. This is primarily because the average travel purchase is more complex and expensive, so people are more likely to take longer to decide. So abandoned cart reminder email is needed. If someone leaves items in their cart for a certain period, it’s good practice to trigger an email immediately reminding them of what they left behind, or providing an offer to sweeten the deal.
Purpletree abandoned cart plugin is to provide information about customers’ products which is added in the cart like shoes, shirts, etc. All the information on the cart will send to the admin via an abandoned cart extension. The admin can inform the customer according to the products which are in the cart. This module is very flexible and easy to use which allows admin to notify the customers about their products which are in the cart via mail. Purpletree abandoned cart also know abandoned card extension for Opencart store.
How Abandoned cart work
First of all install extension with the help of the user guide. After that when the installation is completed then enabled abandoned cart extensions by using enter the license key. When Purpletree Abandoned cart extension enabled successfully then abandoned card extension menu show on the admin left navigation menu.
When the customer will log in to the frontend and choose a product from the product to add the product by clicking the “Add to cart” button. In the backend, the admin can see these products inside the abandoned cart module.
Customer Notification
The admin can able to send e-mail to their customers for any product which is added in the customer cart. Mail will send to the Customer by using the send e-mail button. For e-mail to the customer, admin selected product by using a checkbox of the list and click on the send mail button.
Purpletree Product video Extension use for add product video with the product on product detail page in a nice popup for Opencart store. Purpletree Product videos Extension is very easy to use. A product video is the best method for providing product-related information. With the help of product video, you can increase your product sell and the customer can watch your product all detail. Opencart product video upload supports YouTube and Vimeo videos. To add video with your product first, you can upload product video on “YouTube” or “Vimeo” then get the embed code for the video you want to show on the product page. This embed code enters the product detail page and saves the product detail. After that, the product video will show on the product detail page. It is also known Opencart product video extension, Opencart YouTube extension Opencart product video upload, and Opencart Vimeo extension.
How to add license
First of all, you can install an extension with the help of the user guide. Go to Extension >Extension >Select module> Find “Purpletree Product Video Upload”. After that, first, you can click on the install button thereafter click on the edit button. You will reach on the “Purpletree Product Video Upload” setting page. Here, you can enable the extension status and enter the license key.
Click on the “Get License” button. Enter License Key –This key is provided when you purchase the Extension.
Enter your valid license key in the license key box > click to Ok button > Click to blue color save button. Now your extension license will be activated.
Or
Go to Admin >Extension>Extension > Purpletree Product Video Upload > Edit Module > Click on “Don’t Have License key” button. Enter your Order ID which was generated when you placed an order for our extension and “Email ID”. Click on Submit Button and your license key will be filled on the License key field.
How to add video
Go to the navigations menu select catalog and click on it. Thereafter, click product add or edit button.
Get the embed code for the video you want to show on the product page. This can be easily obtained using these steps: http://bit.ly/2s2T4F6. Paste the embed code for YouTube or Vimeo and define the height and width of the popup for the chosen language tab.
Now click save button. You should see the video link in frontend in the product detail page.
Click on the video link will show Video in a nice popup.
PurpleTree product video upload supports Opencart version 3x and 2x. you can get Free Technical Support: 6 Months.
Opencart product shipping extension allows you to set shipping fee-based on Product / Category / Weight / Zip on a particular product or particular category. You can also set whether the shipping fee should be charged on per product basis, or on per order basis.
Shipping is an amount of a particular kind of cargo that is sent to another country on a ship, train, airplane, or another vehicle. With the help of Multivendor module admin can manage to ship according to the country, zip code of buyer’s address and product weight. Admin can set impact price on the shipping amount based on the country, zip code and weight. The buyer can see how the shipping amount fluctuates with the change in the county, zip code, and weight.
Due to installation not properly
You can check purpletree shipping properly install and status is enabled.
Due to Advanced shipping charge
If Shipping charge type set advanced then all field match with advanced shipping rates like price, weight, shipping country, shipping country zip code . for example you can order a product then ordered product’s price match with shipping rate price. Order’s product weight between shipping rates weight to and weight form. Order ’s Shipping country matches with shipping rates country. Order’s shipping zip code match with shipping rates zip code.
If customers order 2 products. First product detail and shipping detail match with shipping rates and second product detail and shipping detail not match with shipping rates then opencart shipping method not show on the checkout page.
Purpletree Shipping
If you are using purpletree multi-vendor marketplace in your Opencart E-commerce website then Purpletree shipping is best for you. Purpletree shipping is a shipping module of the opencart multivendor marketplace. Purpletree shipping provides different types of shipping for shipping products anywhere in the world.
Type of Purpletree shipping
· Product-wise
· Order-wise
Product-wise shipping
Product-wise shipping base on the product. In this type shipping rate will be applied on order per product means if 3 admin products are added in cart, then shipping rate multiple by 3 will be applied to cart. For example, If you can order more than one product then the shipping charge applies per product.
Order-wise shipping
Order-wise shipping base on order. In this type shipping rate will be applied per Order based if 3 admin products are added in cart, then a single shipping rate will be applied to cart. For example, if you can order more than one product the shipping charge applies once per order.
Type of Purpletree shipping charge
· Flat Rate Shipping
· Advanced Shipping
· Flexible Shipping
Flat Rate shipping
This is a traditional Shipping method, whichmeans shipping charge which is chosen, will be applied to the cart according to shipping Type defined.
Advance shipping
This shipping charge will calculate from Shipping rates defined for each non-seller products. If No shipping charge is found even for 1 or more products in the cart, then the customer will not be able to checkout using Purpletree Shipping Method. Before using this shipping method make sure all shipping rates are defined.
Flexible shipping
In this, when a customer tries to checkout Non-Seller products, first for each product/order it will look for shipping charges from Shipping Rates. If not found then Flat Shipping charge will be applied
Shipping Charge
This Shipping charge will be used for Flat rate Shipping and Flexible shipping for Non-Seller Products.
Defining Advance Shipping Rates from Admin Panel
log in to Admin Panel and go to Purpletree Multivendor > Shipping Rates. From here admin can view a list of shipping rates that will be applied to order. Shipping Rates can only be added and deleted; the Edit option is not there to edit any shipping rate. Shipping Rates can only be added and deleted; the Edit option is not there to edit any shipping rate. Click on Add New from the top right. Admin can assign shipping Rates to any seller. Select Seller name from the dropdown in the 1st column. The first option in Seller’s name is N/A, which means this shipping rate will be applied to admin products. Select Country from the dropdown list. Enter Zip From and Zip To Range. If Zip code is not numeric then Zip From and Zip To must be the same to enable this shipping rate. Enter Price to be applied for this condition. In opencart weight-based shipping Enter Weight From and Weight To Range.Weight To must be greater than Weight from, but both can be set to 0 if not known.
The seller can also add Advance shipping rates by using the seller login.
In Magento 2 Multivendor, How to calculate and manage commission on excel? Which formulae should I apply? How can I view the commission received by the admin or seller? Really difficult to track for e-commerce businesses and finding the best solution for it, is important. Calculating the commission of each product sell and maintaining its record is one of the hectic and tedious activities that every online business has to do.
The commission is a payment that can be made to an employee for his service or to a seller based on the terms and conditions of buying something through the seller. There are various kinds of commission models used in businesses, and they've seen both online and in physical storefronts.
Let’s have a quick look at the Magento multivendor extension offered by Purpletree Softwares for the commission calculation module, which helps to set, view and calculate the commission in a simple and reliable way.
After a successful installation of the Magento multi-vendor marketplace extension, we need to configure by logging-in via the admin panel to calculate and receive the commission.
Enter the commission for admin of seller products for the category of products to be sold. By default value is set to 10.
Seller Commission
In this seller page, we can view the commission receivable by admin for each completed order for this particular Seller.
How can an Admin view commissions
Through the admin panel, admin can view commissions of all the orders of sellers.
Add/Set Commission
This can be done by admin only who can assign the category of commission applicable to the products in a category.
Add commission percent for each product sold by a seller.
Expand the tree and click the radio buttons to select the category.
Save commission.
Edit Commission
If the commission is to be edited, just click the plus sign of the tree and check the selected categories.
How and at when Commission would be calculated
The commission can be calculated after the completion of the order. The admin will get the commission automatically after the completion of the invoice and shipment of any order. There are three criteria for the calculation of the commission.
Commission based on category basis: Here the commission is based on all the products of a category.
Commission based on seller: Here the commission is based on the number of products sold by a seller.
Commission on a global basis: This is applicable to all products mentioned on the website.
The commission is checked first on a category basis, then on a seller basis and then on a global. It means that the commission on the category basis is checked first but if that product is available in more than one category, the maximum value of the commission is selected. If the category commission is not properly defined, then the commission is paid according to the seller commission. If that too is not defined, then a global basis commission is considered.
The commission list will be updated only after the completion of an order.
Registration of a seller
If anybody wants to become a seller, then he has to create a customer id and then he has to select a checkbox to become a seller. After that, the person has to enter a URL for his store. Then the user has to click Create the Account. An Ajax call will check the uniqueness of the URL and then the account will be created.
Two-factor authentication extension provides the functionally to authenticate the customer in a store. Opencart two-factor authentication app is very useful in many ways as if the information of users that admin has is appropriate admin can easily contact the user very easily through the mail and contact number. In that, we have provided the choice where the admin wants to show the popup.
There is a new update in the 2-factor authentication extension is that admin can create the default template of the message that is sent to mail and contact number to verify them.
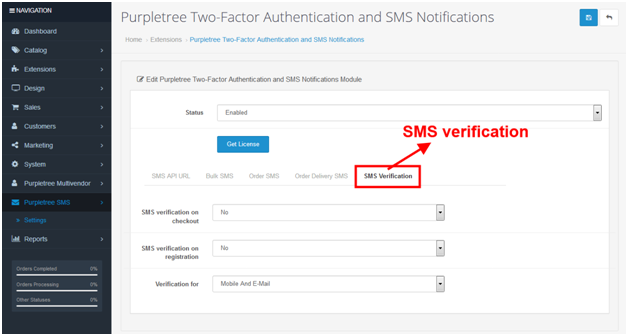
· In the first step to create the SMS template for OTP verification message go to > Admin > Purpletree SMS > Settings > SMS Verification tab.
· In the second step you need to choose the page on which do you wants to show the verification popup (In which user have to enter the OTP which comes on email or mobile). There are two pages that are checkout and register page so, select the page from the dropdown on which do you want to show the popup.
· In the above screenshot as you can see the checkout template and register page template admin can define any template separately for both checkout and register page.
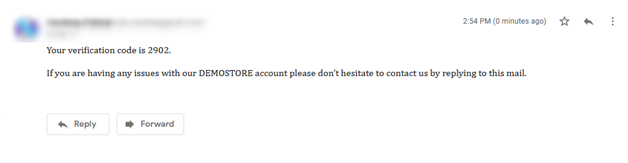
· There is a question arise how _OTP_ variable need use. Leave the _OTP_ variable constant where you wants to show the OTP number for example:
A sample template I have created-
“Your verification code is _OTP_.
If you are having any issues with our DEMO STORE accounts please don’t hesitate to contact us by replying to this mail.”
Opencart Blog Pro extension provides Blog functionality to your Opencart store like Category functionality to create blog base of the blog category, comment management functionality to manage customer comment on blog and SEO URL functionality to fast search by customer. Opencart Blog Pro extension provides the Popular posts module and Latest posts module for show blogs. Tag management is a good functionality of this extension. Opencart Blog Pro extension also called Opencart blog module, Opencart blog extension, Opencart blog, and Opencart blog plugging.
How Admin can add blog Post
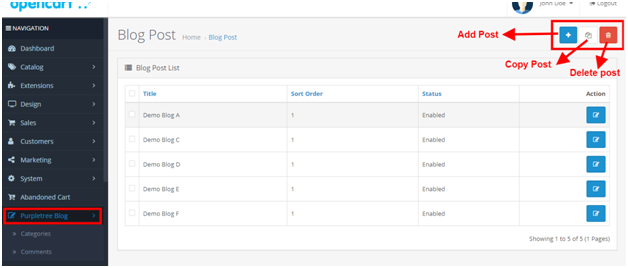
First of all successfully installed Opencart Blog Pro extension. If you want to create a blog based on category, then go to the Purpletree B log menu and click on it, after that select category and click to add category button, to add blog category. For add blog post go to Purpletree Blog menu and select posts and click on it, after that, you will reach on the blog post list page. Here you can add a new post, delete a post, edit post and copy post for creating a duplicate post.
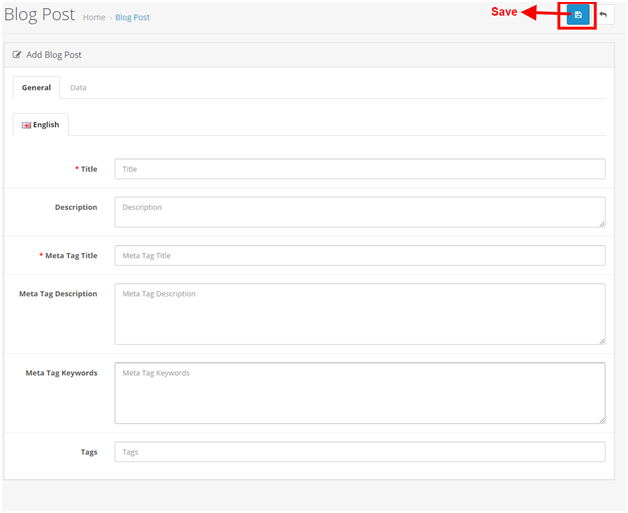
For create, new post click adds button and you will reach Add post page. Here fill all information related to blogging posts such as Title, Description, Meta Tag Title, Meta Tag Description, Meta Tag Keywords, Tags in General Tab and Categories, SEO URL, Stores, Image, Status, Author and Sort Order. Fill all information and click on the Save button.
In this form, some field is required then and click on the Save button. For edit, any blog post selects post in the post list and click on the edit button. Change information and click on the Save button.
For show blogs post, seller blog modules base of the user guide .after that your created Blog post-show on your selected layout page.
You can get FreeTechnical Support: 6 Months with buying Opencart Blog Pro extension.